This page contains some affiliate links. Please review my disclosure policy.
Have you ever wondered how to make kombucha? Save your money and brew your own homemade kombucha with this easy tutorial and kombucha recipe teaching you how PLUS fun flavor variations! Your budget and digestive system will thank you.
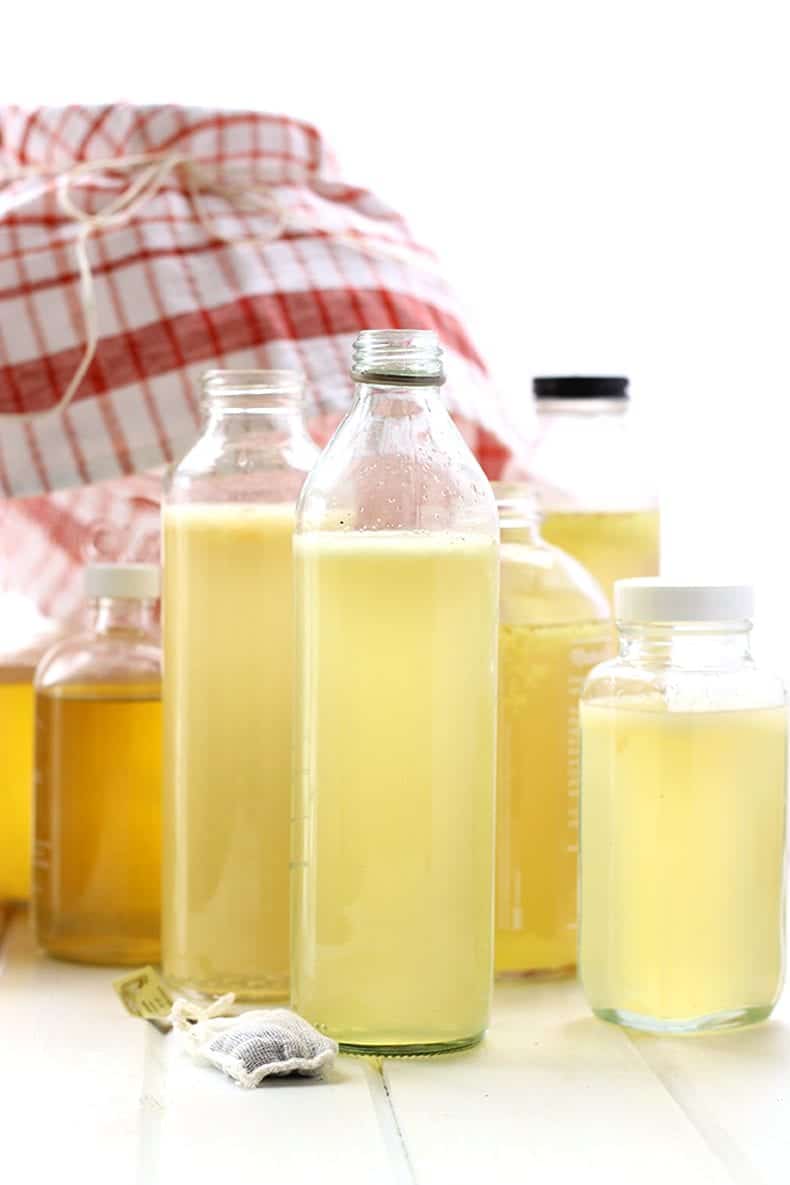
Table of Contents
Brewing your own kombucha can be intimidating but I promise it’s actually pretty easy! I wanted to create a fully comprehensive resource for you including the benefits of drinking kombucha, how to make your own kombucha, pro tips to mastering the brewing process, as well as kombucha recipe flavor combinations to try! Here’s what we’re covering:
This actually isn’t my first time brewing kombucha. I took a fermentation course a few years ago (it’s true!) and loved learning how to make kombucha, sauerkraut and kimchi. I’ve even posted a kombucha recipe for homemade kombucha before (circa 2013!)
At some point I fell off the wagon and just started buying kombucha. But at $3-$4 a bottle, the price tag quickly catches up with you and while your tummy may feel awesome, your budget certainly doesn’t. So I decided to get back on my game and start the brewing process up again. And this time I’m bringing you two new kombucha recipe flavours: grapefruit and ginger aka my two favourite flavors of kombucha and teaching you how to make kombucha on your own.
But first let’s chat about why kombucha is so great.
Why Drink Kombucha?
I’m guessing a descent portion of you got lost somewhere along SCOBY (more on that below) and would like a simple definition of what kombucha is and why you need to start drinking it. So here you go:
Kombucha is a fermented tea that is packed full of probiotics, amino acids and various vitamins that help keep your digestive system in sync and balanced with a good amount of healthy bacteria. The taste is a little bit sweet (depending upon how long its left to ferment and if flavours are added) with a fizzy bite. It is always made with caffeinated green, black or oolong tea (sometimes herbal tea is added but never alone), sugar and a SCOBY. The sugar is required so that the SCOBY has something to eat and in turn produce all sorts of healthy byproducts.
In simple terms: Kombucha is an amazing source of probiotics for your gut. Healthy gut = healthy immune system = healthy human.
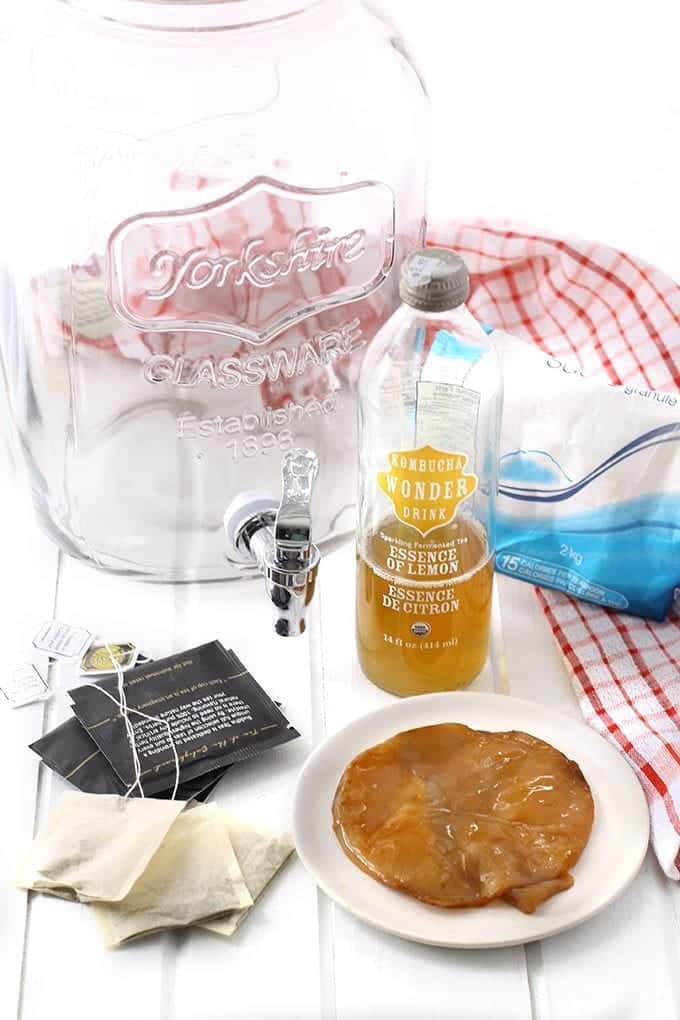
What You Need To Make Homemade Kombucha
Surprisingly you don’t actually need many supplies to make homemade kombucha. Let’s start with ingredients and then we’ll get to tools.
For this Kombucha Recipe you will need:
- a SCOBY (more on this below)
- tea bags (green, black or oolong)
- organic cane sugar
- filtered water
- 1 cup of already brewed kombucha (can be storebought or homemade)
Kombucha brewing supplies:
- 1 large glass jar (I used this one but any large mason jar will work)
- 1 dish towel
- 1 elastic band or piece of strong
- empty mason jars or bottles for bottling your finished product
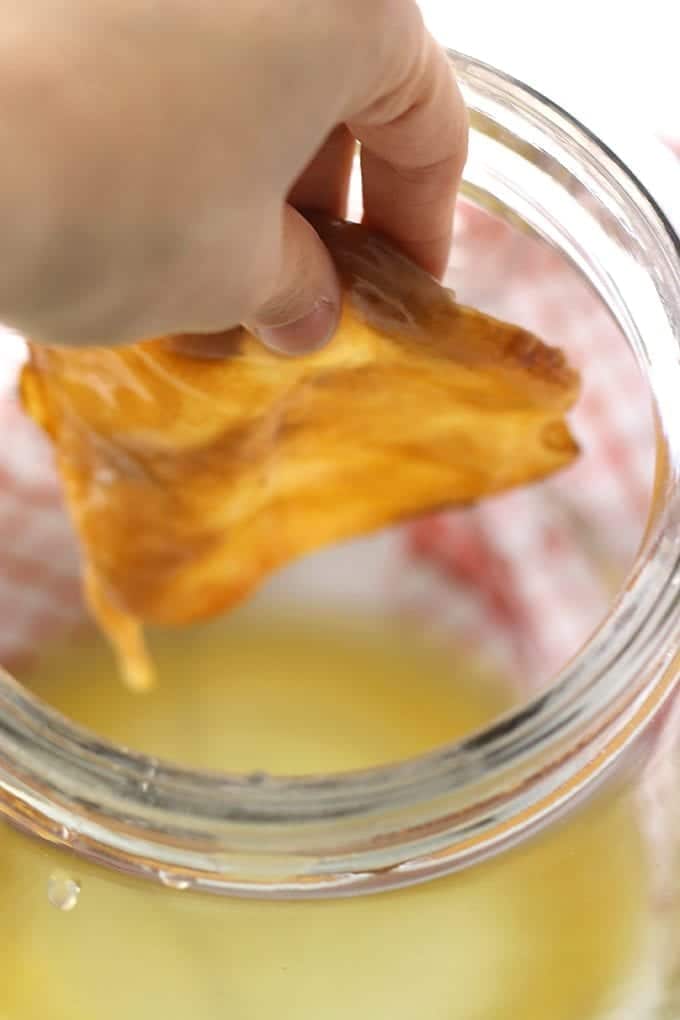
What is a SCOBY?
If you’ve ever learned how to make kombucha before you know that part of the brewing process requires that you use a SCOBY or Symbiotic Culture of Bacteria and Yeasts. The purpose of the SCOBY is to eat the sugar and caffeine in the tea and metabolize it to produce all sorts of health benefits like probiotics, vitamins and amino acids. It’s health properties are particularly impressive considering it looks like a plastic mushroom or IMO a deflated silicone boob. Yes, I just said that.
Can you eat the SCOBY? A question I often get. Technically you can while I wouldn’t recommend it. SCOBY’s are actually great additions to your compost or garden so feel free to dump in there if you’re done with your kombucha making.
Where can I get a SCOBY? Another great question! For starters: ask around! Anyone who is brewing their own kombucha can cut off some of their SCOBY and give that piece to you. This will become your SCOBY (it will continue to grow with each brew). Or you can order one here or make your own according to this tutorial.
Pro Tips: This Kombucha Recipe
A couple of notes about brewing kombucha:
1. YOU MUST USE SUGAR. Calm yourselves people, the sugar provides nourishment to the SCOBY which needs it to survive and produce all of its awesome health benefits. Please do not try to substitute it with another sweetener or GASP…sugar-free sweetener. If done right, the SCOBY will eat most of the sugar and what you’re left with is a tangy, fizzy drink with all sorts of probiotics.
2. Keep things as clean as possible. Make sure your jar is clean and hands are clean when handling the SCOBY. You don’t want any bad bacteria getting in there.
3. My fermentation teacher (this is a thing) always told me to “just relax”. If you find yourselves worrying about your kombucha, it will not turn out. Have faith and put out good juju and you will end up with a delicious brew.
4. Any homemade kombucha recipe is a continuous process, which means as soon as you’re done your first batch you continue brewing another one. If you decide to stop brewing you can keep your SCOBY alive between brews by keeping it in its vessel with a little bit of sugar and kombucha so it’s fully coated. You’ll need to add a bit of sugar each week to “feed” it. If you don’t do this your SCOBY will die and you’ll need to get a new one to continue the brewing process.
Flavor Combinations
After you’re done brewing your kombucha, you can add flavors! You’ll add the flavor to a bottle, top with kombucha (leaving one inch of space between kombucha and the lid), and let sit in a cool, dark place for an additional 1-2 days with the lid secured. After that, you’ll just strain it if there’s thicker material in your flavor and then store your kombucha bottles in the fridge until you’re ready to drink!
- Grapefruit – add ¼ cup freshly squeezed grapefruit juice.
- Ginger – add 1 teaspoon of freshly ground ginger.
- Lemon ginger – add 1 teaspoon of freshly ground ginger and 2 tablespoons freshly squeezed lemon.
- Peach mint – add 1 ripe peach and two sprigs of mint.
- Blueberry – add ½ cup mashed blueberries.
- Mint lime – add two sprigs of mint and the juice of 1-2 limes.
- Mango – 1 ripe mango, chopped.
- Pineapple basil – Add ½ cup chopped pineapple with ¼ cup chopped basil leaves.
- Raspberry, lemon, ginger – Add ½ cup raspberries, the juice of 1 lemon and 1 inch fresh ginger, grated.
Again, remember to strain before storing in the fridge or drinking!
Storage Instructions
So long as you’ve sterirlized your bottles well, your homemade kombucha will last in the fridge for up to 3 months.
Continue brewing your kombucha to keep your SCOBY alive or store in the fridge for several weeks before making another batch.
PrintKombucha Recipe
Brewing your own kombucha is not as hard as it seems! This tutorial will walk you through how to make kombucha and customize it to the flavors of your liking.
- Prep Time: 1 hour
- Total Time: 2 weeks
- Yield: 24 cups 1x
- Category: Drinks
- Method: Ferment
- Diet: Vegan
Ingredients
- 1 SCOBY*
- 24 cups of filtered water
- 1 1/4 cups organic cane sugar
- 6 organic and natural tea bags (green, black or oolong work great – I used green)
- 1 cup already brewed kombucha (you can get this at health food stores or at whole foods)
Supplies:
- 1 large GLASS jar (only use glass – I used this one but any large mason jar will work)
- 1 dish towel
- 1 elastic band or piece of string
- empty glass bottles (amount will depend on size of bottles)
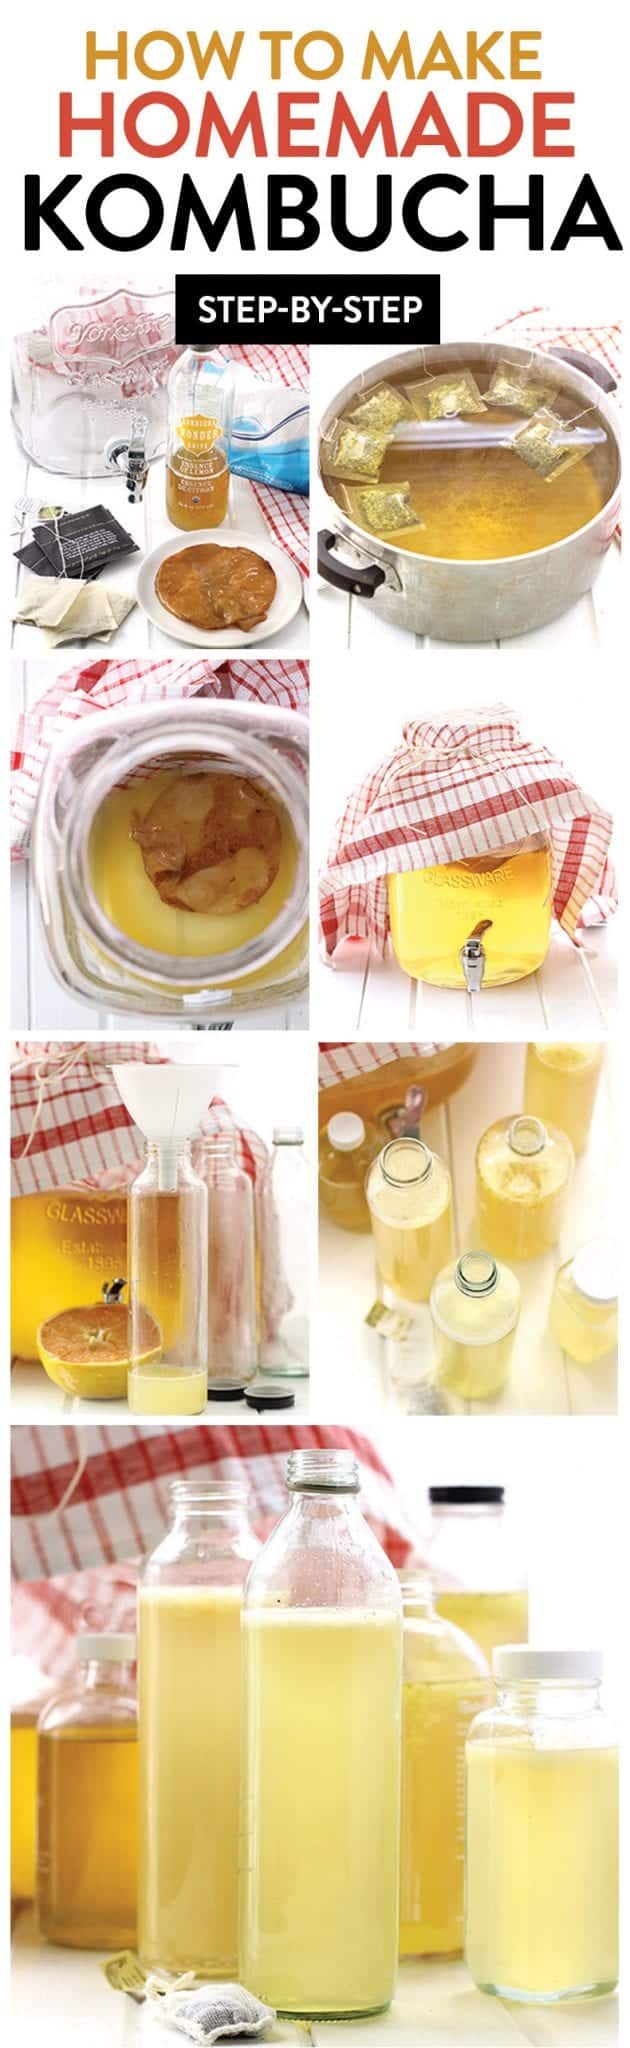
Instructions
- Clean out your glass container so there is no possibility of remaining bacteria.
- Boil 24 cups of water in a large pot and once boiling, turn off heat and add tea bags.
- Steep until water has reached room temperature.
- Remove tea bags and add SCOBY, 1 cup of kombucha, cane sugar, and steeped tea to jar.
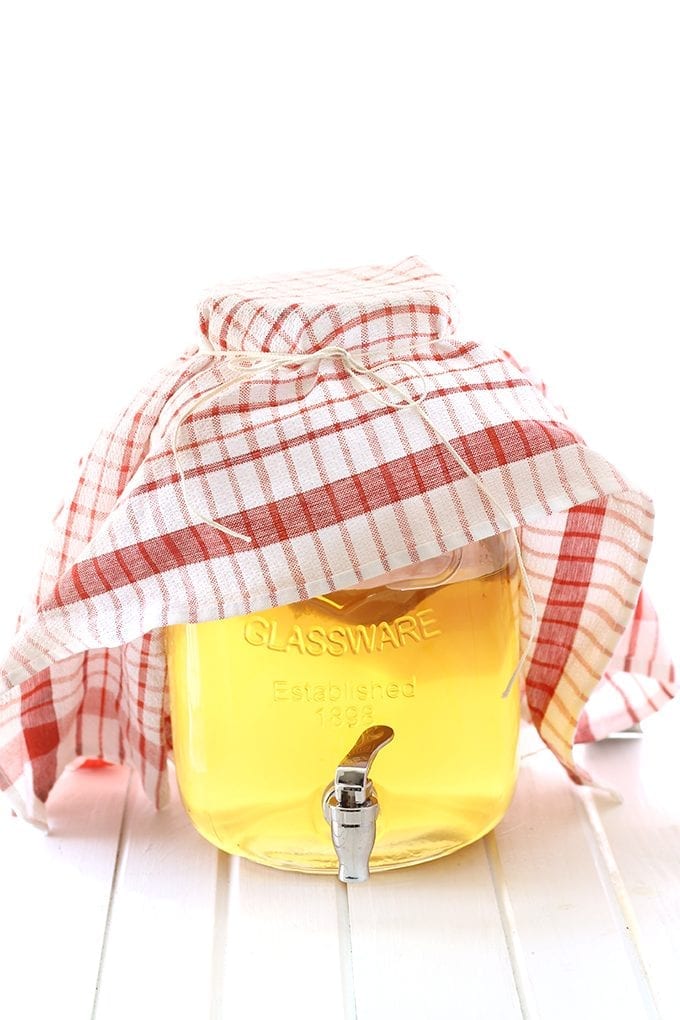
- Cover with a dish towel and secure in place with string or an elastic band.
- Store in a cool, dark place for 10 days. Do not touch at all. I keep mine in a cupboard.
- After 10 days, remove dish towel and divide kombucha between jars, leaving 1 inch of space between kombucha and lid in each jar.
- Your kombucha is ready! You can drink and store them in the fridge for several months.
- If you’d like to flavor your kombucha, here are two options (note* flavored kombucha requires a short second fermentation):
Grapefruit Flavor:
- Add 1/4 cup of freshly squeeze grapefruit juice to a medium sized bottle.
- Top with kombucha, leaving 1 inch of space between kombucha and lid.
- Let sit in a cool, dark place for 1-2 days with lid secured and then store in the fridge until you decide to drink.
For Ginger Flavor:
- Add 1 tsp of freshly grated ginger to a medium sized bottle.
- Top with kombucha, leaving 1 inch of space between kombucha and lid.
- Let sit in a cool, dark place for 1-2 days with lid secured and then store in the fridge until you decide to drink.
*In order to acquire a SCOBY you can ask a friend, order one here or make your own according to this tutorial.


Kombucha helped me kick the soda habit! I used to buy kombucha, but now I brew it myself and love it! So far, I’ve done really well with blueberry/ginger and mango flavors. However, whenever I add anything citrus, lemon, lime, orange, grapefruit, etc… I always lose the effervescent (fizziness) properties. For example, the same batch I made the above mentioned blueberry/ginger and mango flavors and they were high carbonated. I made another flavor combination of strawberry/lime out of the same batch and zero bubbles… Just flat… The flavor was very good! I used freshly juiced strawberry’s and squeezed lime (1/4 cup strawberry, 1 teaspoon lime, 16oz bottle). I second fermented for 2 days… Nothing. Then 4… Then 7… Nothing. I don’t want to add more sugar or ferment for too long… What should I be doing differently?
Hi Clinton! I haven’t run into that issue at all with my citrus flavors but I generally stick to grapefruit. My speculation would be that somehow the acidity of the citrus will require more sugar to fizz to your liking but with such a small amount of lime I’m not sure that this is true. If you do want more fizziness the only real option is to add sugar or more sugary fruit unfortunately! Keep me posted and let me know how it works out. Best of luck!
with grapefruit and certain citrus fruits that aren’t extremely sweet, you should add 1t of cane sugar. the yeast feeds off the sugars, resulting in the carbonation you’re after. hope this helps!
So, you say to clean your fermenting vessel to make sure there is no unhealthy bacteria. Do you clean it in between each batch? I was just going to ‘keep mine going’, but maybe it seems I shouldn’t? Thanks!
I keep it going between batches! If you’re just getting started you should give it a deep scrub but otherwise feel free to keep it going unless you notice your SCOBY growing black mold. Then it’s time to start over.
Thanks so much for posting! I looked into making Kombucha before, but got overwhelmed with the instructions. Yours however are simple enough for me to attempt to wrap my brain around it! LoL I would love if you could message me so that I could get a piece of scoby from you! Thank you.
Well you did it – finally convinced me to give up the price tag and brew my own. A question when flavoring…it wasn’t clear to me whether I just add ginger (Etc) to the main jar we are brewing in or pour into smaller jar?