This page contains some affiliate links. Please review my disclosure policy.
I’ve always been infatuated with the idea of growing your own food, but up until a few months ago it was never an option for me. I’m a city girl by nature but a country girl at heart. I’ve spent 30 years living in cities (Toronto, Montreal, NYC, San Francisco) where gardening just wasn’t an option. But in January we moved to a house outside San Francisco (hello suburban living!) upon which I began scheming our first stab at home gardening.

We decided when we moved that we’d begin our adventures in gardening as soon as the rainy season passed and we returned home from our big trip to New Zealand in March (let me know if you guys want to hear about how that went LOL). Well we got some late season rain at the end of March and between that and our current global situation it felt like the right time to kick things off.
I want to preface this post by saying that I am by no means a professional or experienced gardener. I’ve been infatuated with the idea and have helped friends plant theirs but I have zero experience with my own. I’ve tapped into a bunch of different resources to help me out on this journey (I’ll list them below) but if I’m being honest what I really wanted was to hear from someone who was as inexperienced as me and could teach me about all their mistakes. What I’m learning about gardening is that it requires a lot of trial and error and you learn as you go, so hopefully all my mess-ups can be helpful to you.
With that, I’m going to be chronicling my experiences here, as they go. If you guys want to come along for the ride and try your own stab at gardening – awesome! If not, maybe you can get a good laugh out of mine. So let’s take things back to the beginning where everything started…
Growing from Seeds
I think a more experienced gardener would tell a newbie like me to just buy some seedlings and plant them in the ground or raised beds (more on that in an upcoming post). But I like to learn things the hard way so instead of buying seedlings from the garden shop we decided to start from seeds.
Seeds vs. seedlings: most people know what seeds are however, seedlings are the next step in process where an actual plant has grown from the seed. They’ve been cultivated over weeks to months and you plant those directly into your garden bed.
We decided to start from seed instead of seedlings for a few reasons:
- It felt like a science experiment from which we’d learn a lot
- It’s way more economical to buy seeds than seedlings
- For reasons unknown to me I attended the heirloom seed festival in Sonoma last year and picked up a bunch of packets of seeds
- I have too much time on my hands
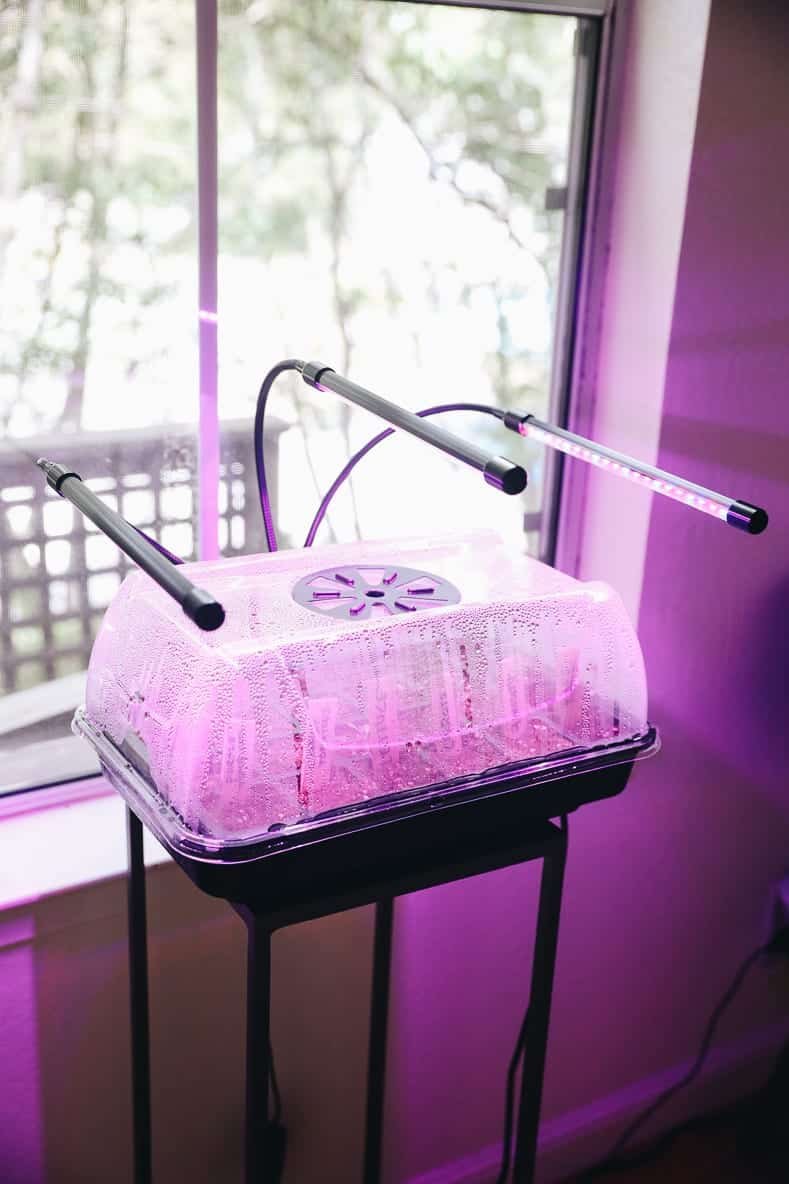
The Equipment
In my research I have learned that some veggies do better when grown from seed indoors than sowed directly outdoors. Some plants are temperamental and need more predictable environments to grow when they’re just little babies, others are pretty hardy and can just be planted outside. Most seed packets will tell you on the outside packaging what conditions it likes. For experimental purposes I planted a bunch of seeds at random all indoors just to see what happens but first I had to get the conditions just right.
Growing seeds into seedlings requires an exceptional amount of light every day. Most recommendations say 12+ hours of light. Seedlings also like temperatures over 70 degrees. Our house does not have anywhere indoors that gets that much light and despite living in California it generally doesn’t get above the 65 degrees most days. So to get conditions just right, we needed to invest in some equipment:
- Seed Starting Trays
- Heating Mat (unless your home is consistently over 60-70 degrees)
- Plastic Dome
- Grow Lights
- Seed starting soil
- Seeds (whatever you want to plant)
You can order all of the above individually on Amazon (I included links to each) or you can do what I did and order this kit (currently sold out but this one is available) + a set of grow lights. I’d recommend the kit because it was honestly made for dummies like me. The seed starting soil you can get from most hardware stores, garden stores or home depot (which delivers).
I’m not gonna lie, it looks like we have a grow-op in our house…
The Process
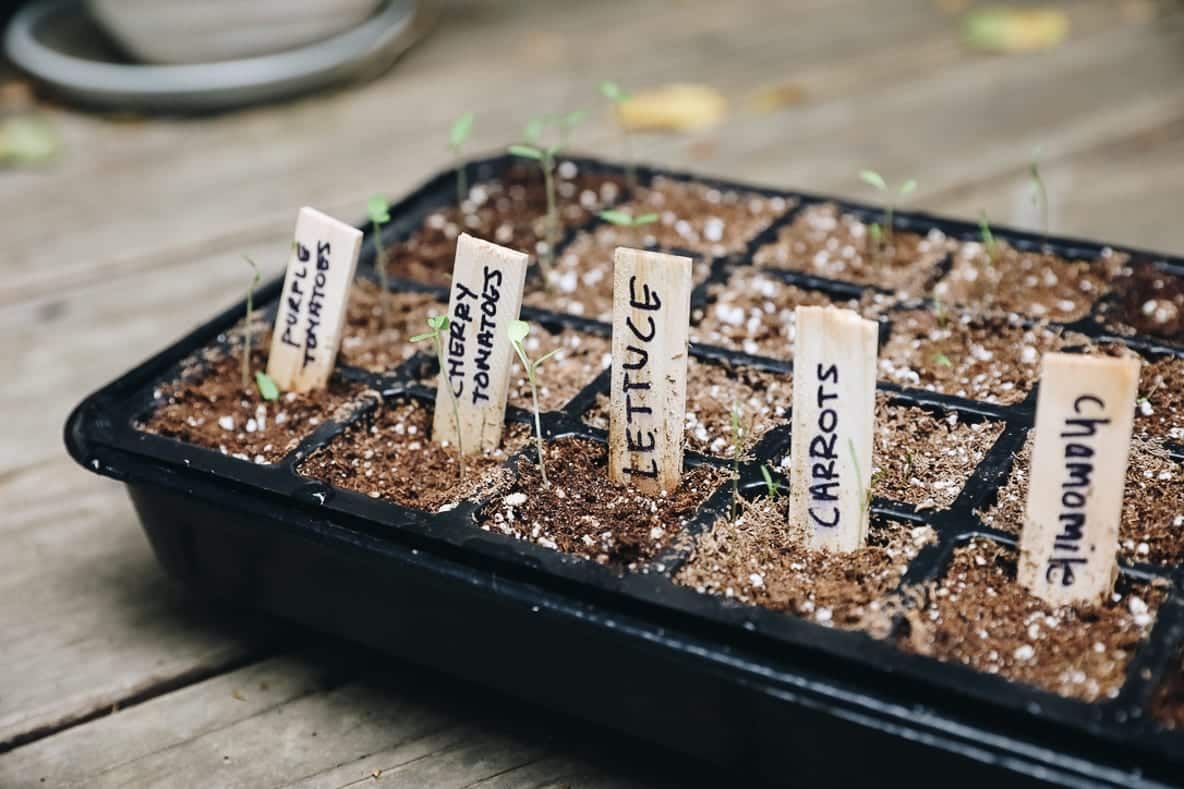
So now that you have your equipment, it’s time to plant your seeds! Again you’ll want to come back to your seed packets to determine conditions. Most will tell you how deep to plant and how far apart to plant seeds. It may seem tempting to dump all your seeds into a tray and hope for the best but there’s actually some technique to this. Plant 2 seeds however many inches apart as indicated on the packet. In the end you’ll end up cutting (thinning) one of them, which seems counterintuitive but hey, that’s what the experts say to do!
So to go back to basics you will:
- Fill seed trays with seed starting soil
- Plant seeds however deep as indicated on the packet
- Cover with however much soil indicated on the packet
- Water the seeds – recommended to dip the seed trays in water and let sit to bottom water it
- Place seed tray on heating mat (turn it on) and cover with dome (or place inside dome kit like the one I ordered)
- Turn on grow lights for 14-16 hours a day
- Turn off grow lights at night to let plants rest
- Once seedlings emerge remove the plastic dome or cover.
Now you wait! I’ll be honest, when you plant your seeds it’s hard to believe anything will grow from it. It feels like you’re throwing caution to the wind and hoping for the best but that makes it all the more exciting when your first seedling pops up from the soil!
Some seedlings germinate (pop up above the soil) within 2 days, others take weeks. Your seed packet should tell you how long it will take to germinate. You’ll need to water it every day or couple of days with a spray bottle to keep the soil moist. Every morning C and I would open the dome to check in and be amazed by how incredible and smart those tiny little seeds can be.
At this point we have no idea if they’ll transport well into the garden beds and/or how successful we will be at this but just seeing those little seedlings grow is enough to keep us encouraged and optimistic. While I certainly recognize growing from seeds isn’t for everyone, I highly recommend it simply because it is fascinating and so cool to witness. I really hope our veggies survive because the idea of eating them one day is truly incredible.
For now our seedlings are happy inside their little kit and in about a week or two we’ll begin thinning them before planting them into the garden bed (or containers) in a few weeks. Stay tuned for the next post on how we’re building and designing our garden bed and hopefully down the line more lessons I’m learning in gardening.
Resources
I have consulted countless resources but these are the ones that have been the most helpful:
The Well Essentials Beginner Gardener Course
Garden Betty
Gardeners Supply Company – Garden Planner
Are you a home gardener? Any lessons for me?!


Ooohh nice setup for seed germination! Perfect instructions, too!