This page contains some affiliate links. Please review my disclosure policy.
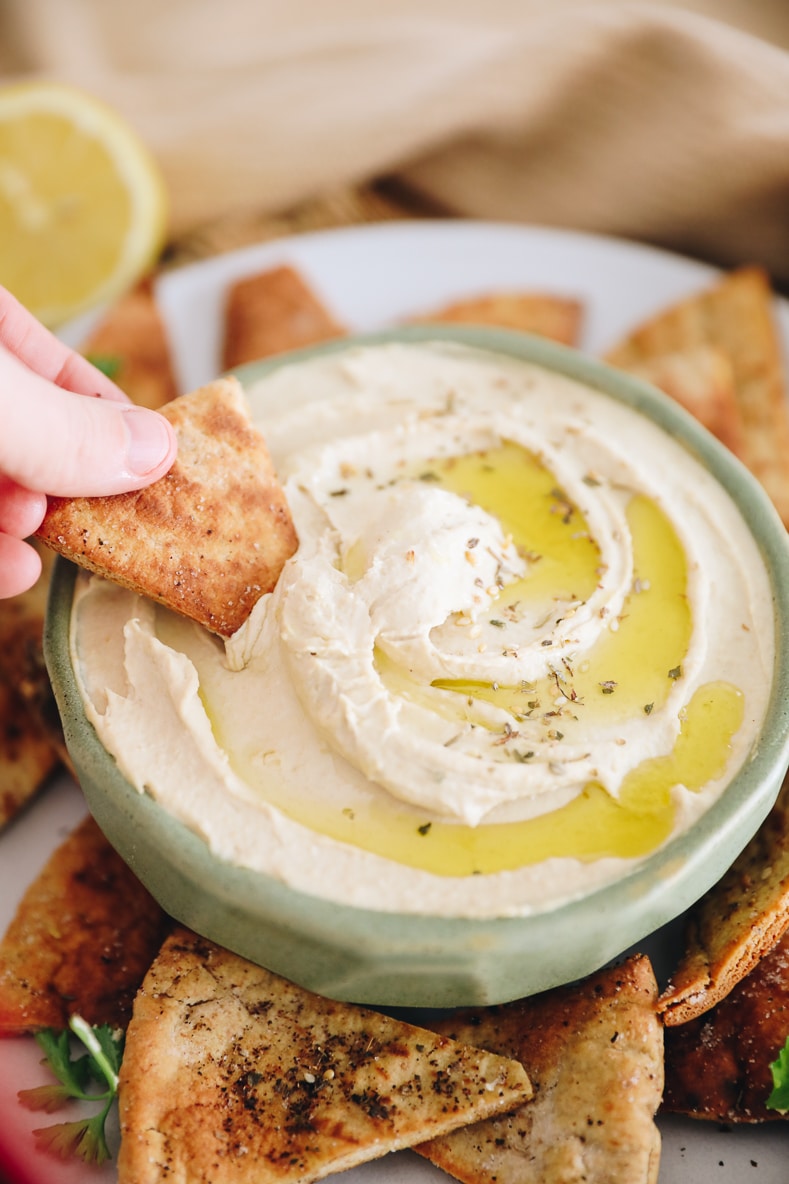
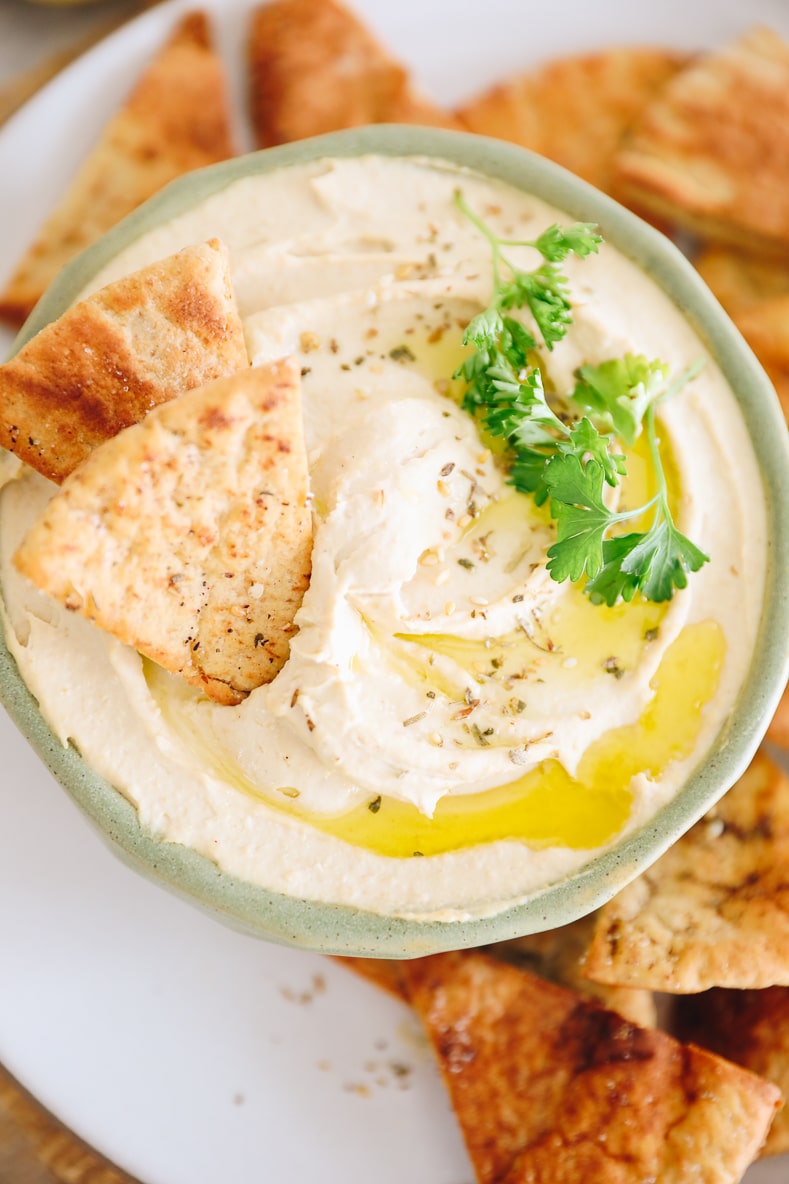
Looking for the best hummus recipe ever? This famous hummus recipe utilizes two techniques to make the creamiest, most delicious hummus recipe you’ll ever try. Perfect for pairing with pita chips or freshly chopped veggies!
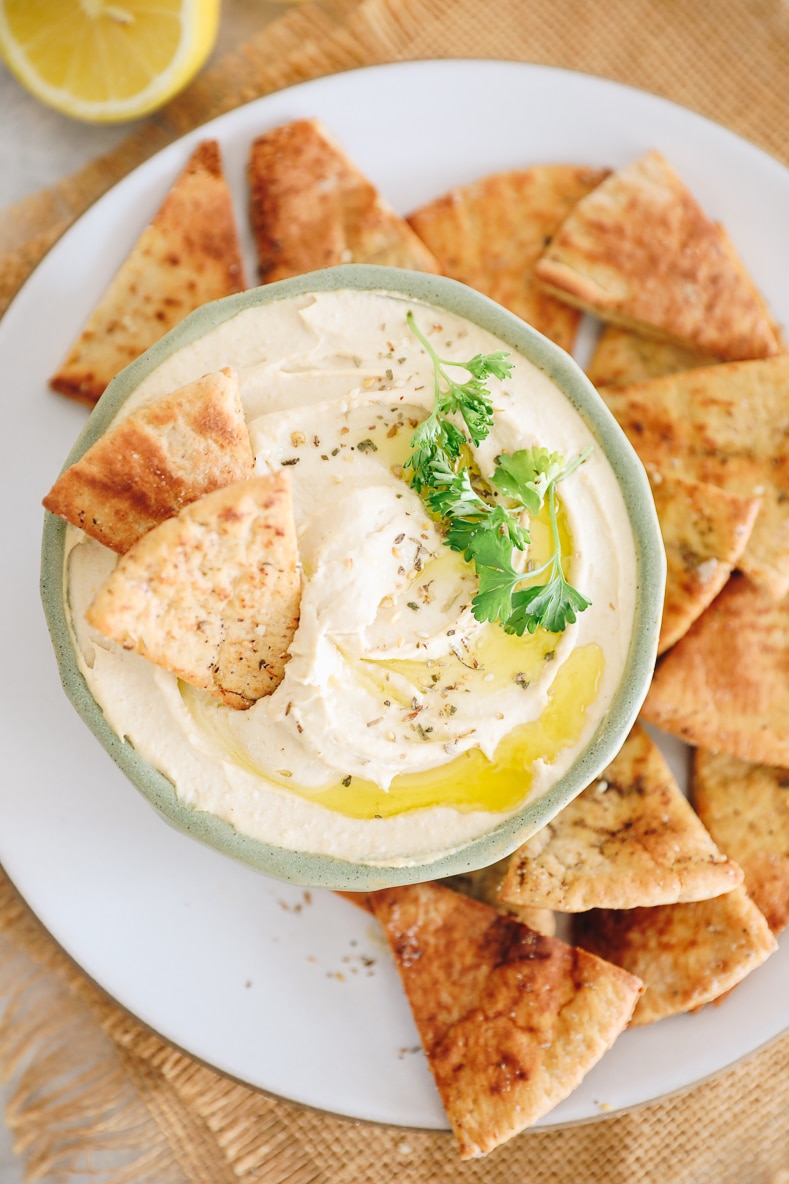
Table of Contents
I wish I could take credit for this hummus recipe but credit must be given where credit is due: My former recipe developer, Jess Franks.
Jess worked for me for many years helping to test recipes, kitchen prep for shoot days and occasionally step in as my therapist. Jess worked as a private chef and was trained in America’s Test Kitchen so naturally her recipes are VERY good.
One time I was over at her house (not working!) and she served me the best hummus recipe ever. Truly. It was better than store-bought! I knew then that we had to highlight her skills and show off her famous hummus recipe. So thank Jess for this 5-star homemade hummus using techniques that only a pro would know. Trust me – you’ll want to make this!
What Makes This Hummus So Good?
The biggest thing that makes this hummus stand out is the texture. It is the creamiest, smoothest hummus you will ever try. To achieve this velvety texture there are two techniques required:
1. Cook the chickpeas – even though we’re already using canned chickpeas, you’re going to want to cook them even more. Cooking the chickpeas softens them, which will make the hummus creamier.
2. Remove the outer skins from the chickpeas– To achieve a super creamy hummus you’ll want to remove the outer skins. You can do this individually but this usually takes a long time. Jess implements a technique from Cook’s Illustrated where you cook the chickpeas with baking soda. The baking soda will help to remove the outer skins from the chickpeas so you’re not having to individually remove skins. Full instructions below.
Ingredients You Need
- Chickpeas – we use canned, cooked chickpeas. You could use dried chickpeas but note that you’ll need to quick them extra!
- Baking soda – this is purely for helping to remove the skins from the chickpeas. You will not taste it at all!
- Tahini – ground sesame seeds. You can find this at most grocery stores in the nut butter aisle or occasionally in the mediterranean aisle.
- Lemon juice – Ideally we’re using fresh lemon juice.
- Olive oil – extra virgin olive oil for the best flavor.
- Salt – I would not recommend skimping on the salt unless you’re concerned about sodium levels.
- Cumin – ground cumin is the way to go in this hummus recipe. Additionally spices can be added (see note below)
Doesn’t get much simpler than this! One reason why I love Jess’ hummus is because she leaves out the garlic cloves. I personally don’t love a super garlicky hummus. I find the flavors of raw garlic to be overpowering in hummus from scratch.
How To Make The Best Hummus Recipe
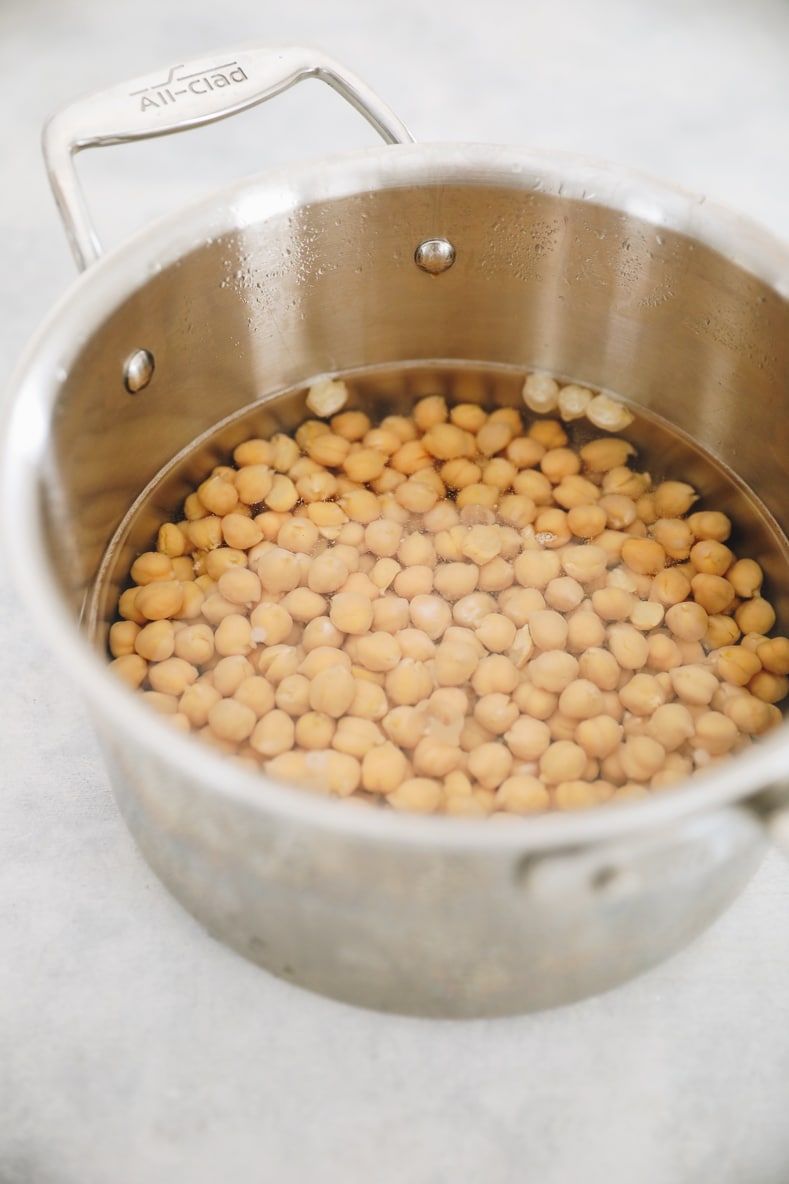
STEP 1: COOK CHICKPEAS
Place the chickpeas and baking soda in a pot and cover with water, about 2 inches. Bring the chickpeas to a boil and then turn down the heat to maintain a simmer for about 15-20 min.
STEP 2: REMOVE CHICKPEA SKINS
Drain the chickpeas into a colander and place them back into the pot and fill it with cold water. Using your hands, swish the water and chickpeas around to remove the skins. Using a small sieve or your hands, remove the skins from the surface of the water. You will need to swish the water a few times to make sure you get the majority of the skins from the water. Once you feel you haver removed as many skins as you can, drain the chickpeas. Pick out any leftover skins. No need to get all of the skins! That will take you forever. Just get as many as you can.

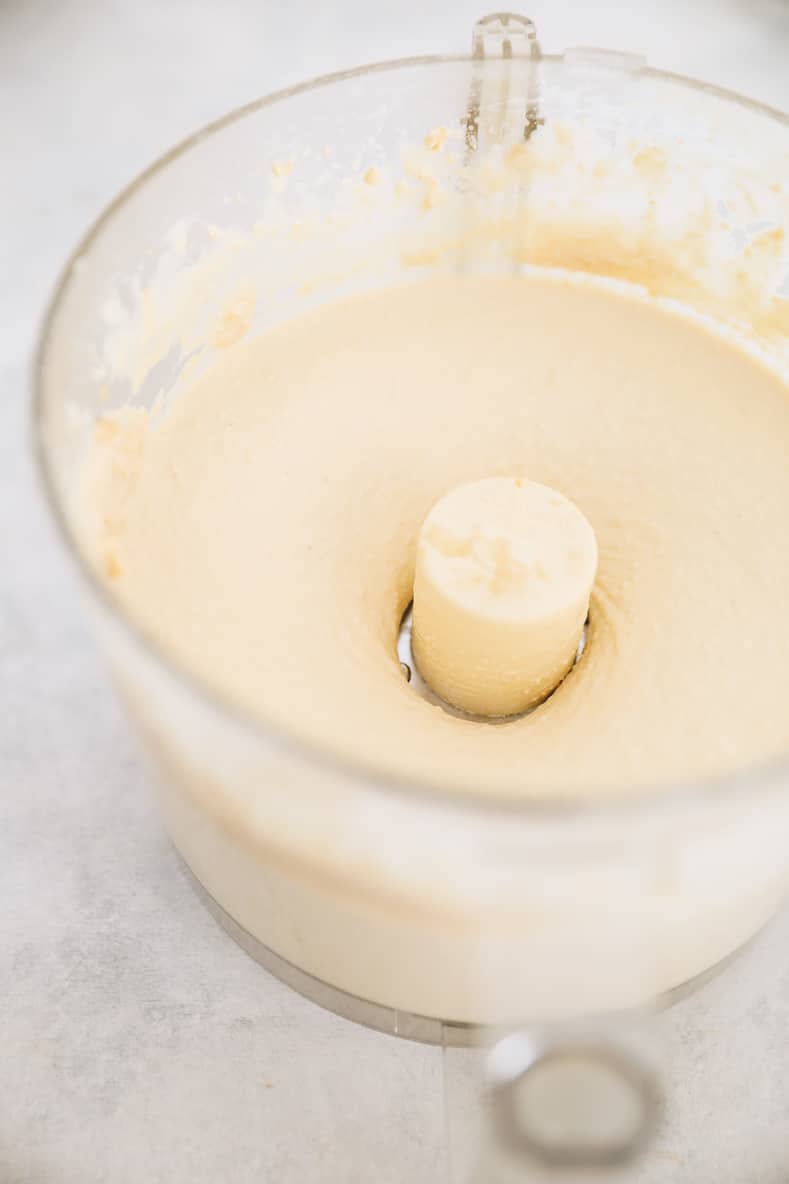
STEP 3: PROCESS HOMEMADE HUMMUS
Place the chickpeas, tahini, lemon juice, olive oil, kosher salt and cumin into the bowl of a food processor or high-speed blender. Blend these ingredients while streaming in the water. I use about ⅓ of a cup but add as much water as necessary to get to your desired consistency.
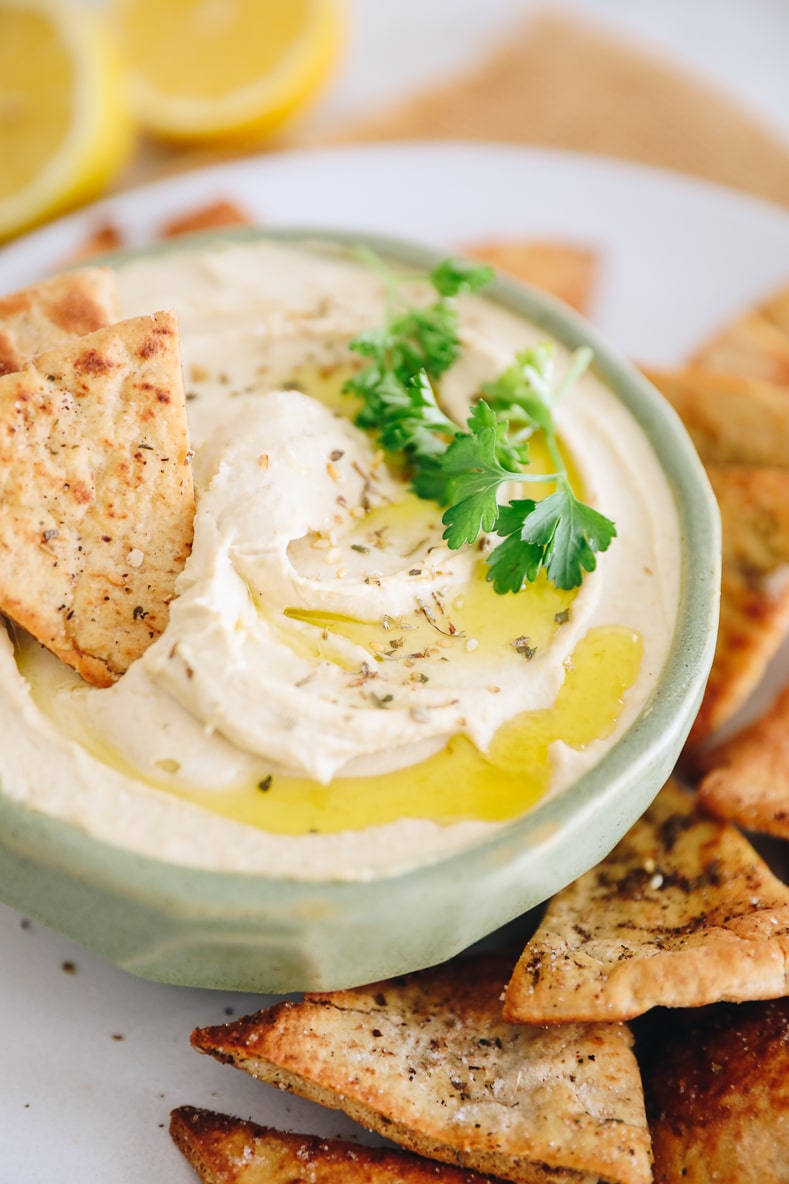
STEP 4: SERVE!
Serve with pita chips or desired veggies. Store in an air-tight container in the fridge for up to 1 week.
What To Serve with Homemade Hummus
The obvious choice to serve with hummus is pita chips or fresh pita bread. We love these homemade baked pita chips and honestly, I try to have them on hand at all times.
Veggies of all varieties make a great dipping vessel for this homemade hummus recipe. Cucumbers, carrots, red peppers and even cauliflower or broccoli are all good options. You could also stir into salads!
I also love topping my Middle Eastern dishes with this delicious hummus recipe. Here are a few favorites:
- Greek Chicken Gyros
- Chicken Shawarma Bowls
- Roasted Veggies with Tahini and Za’atar
- Baked Falafel Bowls
- Green Shakshuka
- Mediterranean Bowls
Pro Tips + Easy Swaps
Change up the spices – you can sub in a variety of spices or simply sprinkle on top. Some of my favorites include: freshly cracked black pepper, paprika, sumac and za’atar.
Drizzle with olive oil – traditional hummus recipes are often topped with a drizzle of olive oil and fresh parsley. It also makes it look fancy if serving to guests!
Use a food processor – You can 100% use a high powered blender but I do find this hummus recipe is the creamiest when you use a food processor.
–>FAQs
The extra step to cook the (already cooked!) chickpeas is what makes this recipe so creamy. I highly recommend you do this though it will still taste great even if you don’t.
Baking soda helps to remove the outer skins of the chickpeas so that they come off more easily. Removing the skins is key to a super creamy hummus.
No worries! You’ll want to remove most but not all of the skins. Some will be stubborn so don’t stress if you can’t get them all.
I personally find raw garlic to be overpowering in hummus. For a more traditional flavor it’s been to keep it out or if you really like garlic you can add in one fresh clove.
Storage Instructions
Store your hummus recipe in an airtight container in the fridge for up to 1 week. I would not recommend freezing, unfortunately.
More Dip Recipes:
- Homemade Baba Ganoush
- Easy Greek Yogurt Tzatziki
- Roasted Butternut Squash Hummus
- Lemon Hemp Hummus
- Skhug Recipe
- Homemade Green Goddess Dressing
Creamiest Hummus Recipe

Looking for the best hummus ever? Jess’ famous hummus recipe utilizes two techniques to make the creamiest, most delicious hummus you’ll ever try. Perfect for pairing with pita chips or freshly chopped veggies!
- Prep Time: 20 minutes
- Cook Time: 20 minutes
- Total Time: 40 minutes
- Yield: 10 servings 1x
- Category: Appetizer
- Method: Cook
- Cuisine: Middle Eastern
- Diet: Vegan
Ingredients
- 2 cans chickpeas, drained and rinsed
- 1/2 tsp baking soda
- 3/4 cup tahini
- 1/3 cup lemon juice, about 1 lemon
- 2 tbsp olive oil
- 1 1/2 tsp kosher salt
- 1 tsp cumin
- Room temp water (about ⅓ cup)
Instructions
- Place the chickpeas and baking soda in a pot and cover with water, about 2 inches. Bring the chickpeas to a boil and then turn down the heat to maintain a simmer for about 15-20 min.
- Drain the chickpeas into a colander and place them back into the pot and fill it with cold water. Using your hands, swish the water and chickpeas around to remove the skins.
- Using a small sieve or your hands, remove the skins from the surface of the water. You will need to swish the water a few times to make sure you get the majority of the skins from the water. Once you feel you haver removed as many skins as you can, drain the chickpeas. Pick out any leftover skins. No need to get all of the skins! That will take you forever. Just get as many as you can.
- Place the chickpeas, tahini, lemon juice, olive oil, kosher salt and cumin into the bowl of a food processor or high-speed blender.
- Blend these ingredients while streaming in the water. I use about ⅓ of a cup but add as much water as necessary to get to your desired consistency.
- Store in an air-tight container in the fridge for up to 1 week.


What did you sprinkle on top of the hummus? Olive oil and…
Olive oil, parsley and za’atar!
I’ve made this twice already. It’s a fabulous recipe! I made a roasted garlic and red bell pepper hummus. I did some changes, based on my personal taste. I only used a few tablespoons of the tahini paste, which I made my own paste.
I also cut off the top of a garlic bulb, drizzled it with olive oil and sea salt and roasted it in the oven on high heat. I put several cloves of roasted garlic in the recipe plus I roasted a small red bell pepper over the gas stove and scraped off the skin and discarded the seeds.
Yummo! It’s a keeper!
I wondered how many minutes the hummus get blended. It makes a difference to me.
One last comment, try this with home-cooked chickpeas and you might like it even more.
Tried it and absolutely loved the taste! I’m also not a fan of garlicky hummus and really enjoyed this version without it. The only issue I had was that it did turn out super creamy straight out of the blender, but when I stored it in the fridge it became quite hard an a lumpy. Maybe I need to try to add more water next time? Will definitely make this again. Thanks Jess for sharing with us!
So glad you enjoyed! The hummus will firm up a bit in the fridge but definitely shouldn’t get lumpy. I’d imagine a bit more water should help you next time around!
Such a cool trick to cook the chickpeas with baking soda to remove the skins. I’ve tried before boiling the chick peas for hummus before and it made it pretty smooth. I bet removing the skins will be even smoother! Excited to try this 🙂
Let me know if you end up trying it!