This page contains some affiliate links. Please review my disclosure policy.
Before we jump into part #2 of my gardening diaries be sure to check out part #1 where I discuss why we’re doing this, starting veggies from seeds and how I know absolutely nothing about gardening…
So when we last left off we I had planted seeds into our mini greenhouse and magically tiny little seedlings had begun to sprout. As I mentioned in that post, all of this is really a big experiment and so far it had been successful. We knew we had a few weeks ahead of us before being able to plant any of our seedlings into soil but we figured we’d get a head start and also start playing around with sowing seeds directly into the dirt and so began our journey into the world of raised beds.
The House
Before we get into the beds themselves I wanted to quickly chat about the house and what we were working with when it come to gardening on this type of property…
We are incredibly grateful to have found this house and absolutely love the space and neighborhood. One thing we didn’t realize when we moved in is that the light isn’t all that great for gardening. The property is surrounded by trees which blocks a lot of the sunlight coming in. This is something that we can certainly live with, but isn’t the best for gardening. So we did some researching (aka watched the light on our property over a couple of days) to determine the sunniest spots.
Our conclusion: The deck in the backyard and the patio off one of the bedrooms seem to be the best. As renters, we were also weary of digging up any of the soil and planting directly into the ground (plus we weren’t interested in soil testing and all that business) and so raised beds and container gardening seemed like the best bet. I’m learning that there are many different ways to garden but this seemed like our best option for successful gardening.
Building Raised Beds
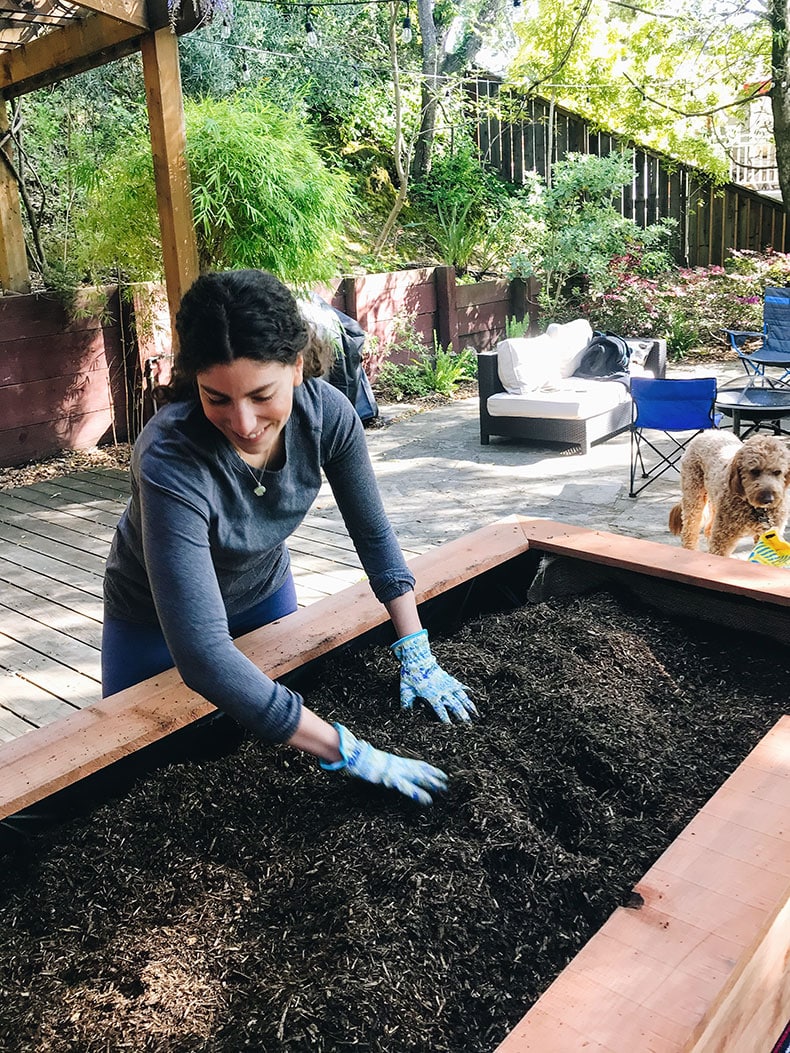
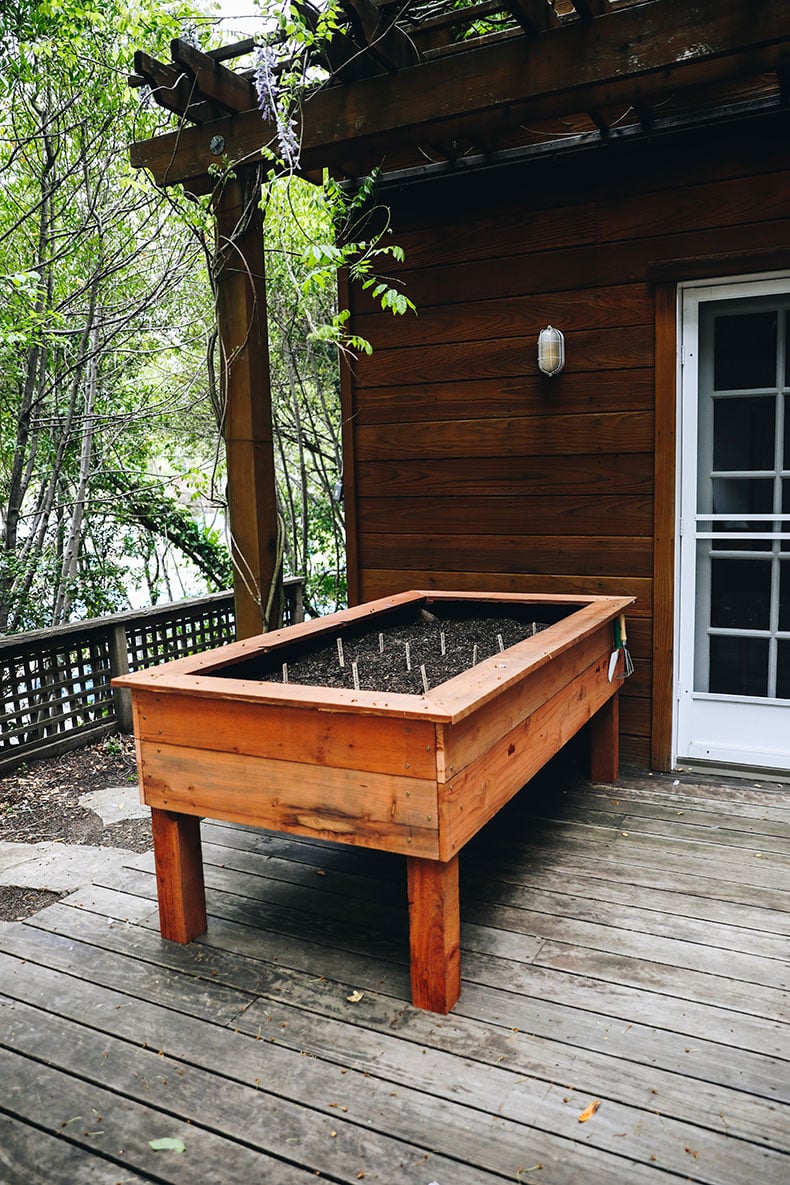
After looking at the light on our property and determining where the best light was we decided to put a large raised bed on our back deck, along with a couple large pots for tomatoes on our bedroom patio. Thankfully, I married an engineer who loves building things so putting together a raised bed was a fun project for him. I’m going to let him describe what he built but I will say that there are much easier ways to build a raised bed if you aren’t handy at all.
Home Depot sells planter cinderblocks that you can easily slot your wood into. For one garden bed you’d by 4 cinderblocks and 4 pieces of wood. If you want it taller, double it up to 8 cinderblocks and 8 pieces of wood and stack them on top of each other. Just make sure your wood is untreated (cedar or redwood is ideal). If that is even too DIY for you then there are plenty of pre-built garden beds you can buy.
As for our raised bed, here’s what C did:
3 foot by 6 foot garden bed that is ~ 12” deep
*note – this is a very raised garden bed that has roughly 16” of clearance between the bottom of the garden bed and the deck below – in our case for our dog!
MATERIALS:
LUMBER
(Base)
- 1 x [3 ft x 6 ft] cut of a 3/4” thick ply
(Corner Posts)
- 4 x [4 in x 4in] posts cut to 30” long
(Sides)
- 2 x [1 in x 8 in] long bottom side board cut to 74.5”
- 2 x [1 in x 8 in] short bottom side boards cut to 36”
–
2 x [1 in x 6 in] long top side board cut to 74.5”
2 x [1 in x 6 in] short top side boards cut to 36”
(Picture Frame Edging – Optional)
- 2 x [1 in x 6 in] short edge cut to 37.5”
- 2 x [1 in x 6 in] long edge cut to 74.5”
HARDWARE
- 50 Cabinet screws (3” long)
- 10 metal L-brackets (can have 2 or 3 holes/screws per flange)
- 40 Screws for brackets (option to buy with brackets)
- 4 x Flat brackets (optional – to secure side boards together in assembly)
TOOLS
- Power drill
- Appropriate drill bits (likely phillips and star bits)
- Saw – (jig saw is easiest, hand saw works too, just more time and detail)
- Clamps (optional, make assembly easier)
Directions
(For easiest build, get all cuts made at the lumberyard or hardware store – be sure to check/call online to make sure they have a saw and are making cuts! Some places can arrange pre-cuts and pick ups right now)
Steps
Pre-Assembly(Optional)
- Fasten bottom and top side boards together in the middle with flat brackets
Frame Assembly
- Place two corner posts on a flat surface roughly 6 feet apart
(If pre-assembly option)
- Arrange connected long side boards on top of the posts lying down and flush with the tops of the posts
- Make sure the long side boards hang over the corner posts by 3/4” on each side
- Screw side boards into posts
(If no pre-assembly option)
- Arrange top long side boards on top of the posts lying down and flush with the tops of the posts
- Make sure the top long side boards hang over the corner posts by 3/4” on each side
- Screw side boards into posts, and repeat steps 3/4 with the bottom long side boards immediately below
Bottom Corner Notches
- Cut corners out of the plywood base to make space for posts
- **Note while they are called 4”x4”s, the dimension is actually 3.5”x3.5” so this is the cuts you should make
Connect Base to Frame, Long Side 1
- Lay one side of the long sideboards attached to the corner posts ‘face down’ so that the long sideboards are directly on the ground and the posts are laying (Attached) on top of them
- Slip the ply wood into place roughly 1” above the bottom of the long bottom side board – (here the corner cuts should allow it to fit nicely – if not make minor cuts as needed)
- Install 3 L-brackets along the Botton to connect the base to the sideboard
Connect the Short Sides
- With the current set up, install the short side boards standing vertically with screws making sure the edges are flush – it should fit right in the gap you left with the overhang earlier
Connect the other long side and two posts
- Place the opposite long sideboards and posts on top – again with the corner cuts it should all fit together
- Screw the sideboards into the posts to secure
- Install 3 brackets along the bottom of the long side and 2 brackets along the bottom of each short side
- Drill ~ 5 drainage holes throughout the plywood spaced out across
(Optional) – Picture Frame Edge
- Cut optional picture frame cadges at 45 degrees in each corner
- Place on top and screw into top of posts
Linings
- Lay down and linings you want to use (we used 1 wed-blocker liner to cover holes and 1 loose netting for support, not required)
Finishing Touches
-
- Drill in a few screws on the side to hold tools!
- Reinforce the bottom if needed – if it looks to start bending under weight of soil. We added some scrap ply wood to the bottom and simply screwed it into the plywood base
…Davida here…this gave me a headache…lol
Next: Picking Soil
I’ll be honest, I did not realize how nitty gritty and specific people got about soil. I really thought you dumped dirt into a box and planned for the best. Not so much…Turns out there’s a science to the perfect growing soil for produce. I’ve also discovered that everyone and their Mom has an opinion on this. You may disagree with me, but after much research here’s what I determined to be the best ratios:
-60% organic topsoil
-30% organic compost
-10% organic potting soil
To determine the ratios of each we used this online calculator, which was SO helpful. Just put in the size of your garden and it calculates the amount of soil you need – we then used the ratios above to determine how much of each type of soil we would need to buy.
You’ll notice all of the soils listed above are organic. As many of you know I try to buy organic when possible. Not only is it better for growing, it is also wayyyy better for the environment. Go organic if you can!
Planting Seeds
As I mentioned in part #1 we are growing some seedlings indoors to plant in our raised bed and containers, however we did want to experiment a bit with sowing seeds directly into the soil. At this point we’ve planted our seeds and are waiting for them to germinate. Our indoor seedlings are doing great and will be ready for transplanting in a few weeks. Our tomato seedlings are looking especially good and once we’re ready to transplant those we’ll fill our containers with the soil breakdown above and install some trellises next to them.
Each morning I lightly mist the garden with our house to keep the soil damp but not soaking. I was told to water in the morning to prevent too much evaporation if I watered mid-late day. So far so good though remains to be seen if any plants will grow.
Hopefully the next time I check in we’ll either have some little baby plants growing in our garden and/or be ready to transplant our indoor seedlings to the outdoor garden.
*Quick thing I wanted to add: Everyone’s experience with gardening will be different because we all live in different climates with different access to space and sun. We have a relatively mild climate working in our favor here so we’re able to start planting right now. Some of you may have to wait until the weather warms up to begin planting. Use this guide (or this one for specifics within the US) to determine your climate region and what grows best under those specific conditions.
Resources
I have consulted countless resources but these are the ones that have been the most helpful:
The Well Essentials Beginner Gardener Course
Garden Betty
Gardeners Supply Company – Garden Planner
Are you a home gardener? Any lessons for me?!